

Château Enginerd became ours a few weeks ago but it wasn’t truly move in ready. The to do list for the builder was 20 articles long and it is still being worked on. Because I thought it would be a good project, we asked that the master bedroom closet be left pristine so we could design the space and optimize it for our needs. The room is about 10 ft by 6 ft so there wasn’t much we could do to mess up the space, especially knowing that quotes for a professional design would range in the thousands. The plan was to go with an industrial minimalistic vibe that would require less than $500 USD to complete. This included the budget for the router and a jigsaw I have been eying for a while. How cool is that!
These were the materials we used:
- Qty 1 4’x8′ oak plywood ready to paint cut down to size by Lowe’s staff.
- Router, 1/4″ Round Out bit and 3/4″ dado bit.
- Circular saw with 100 teeth rating blade.
- 1 gallon quick varnish paint
- Roller and tray set
- Kreg jig
- 1 1/4″ Kreg wood screws
- 2×4 (for 45 degree French cleat)
- 3″ stud screws
- Qty 16 wall self drilling anchor screws 100 lb capacity
- Qty 4 of 3/4″ x Xft long threaded pipe with fittings
The closet itself is a very simple design: a center console/shelf unit with 4 rods sticking out to the drywall. I used qty two 14″x90″ panels as the sides and had the left over wood panel cut down to 13 1/2″ intervals for the shelves. (Turned the left over ones into practice material for the router dado efforts.)
Word of caution: The store’s bandsaw crosscuts will leave jagged edges and damage the end trim severely. Sanding them down doesn’t work. Leave a few inches of extra material to finish or rip the plywood yourself.
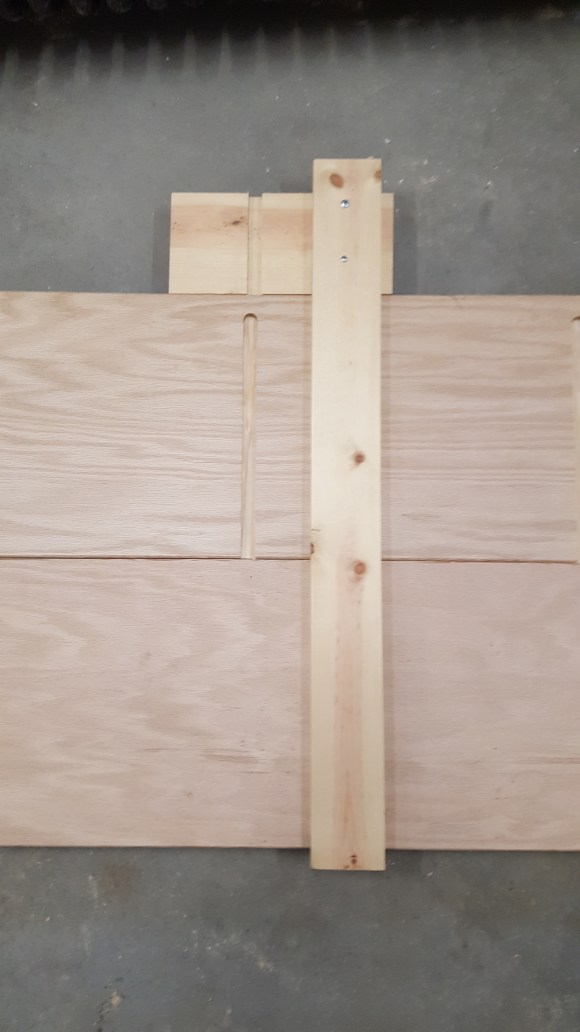
To put together the middle shelf unit that will support the 4 clothes rods I decided to use unfinished dado joints. These joints reduced the fastener count but required precisely lined dado joints which is a bit more difficult to pull off. To match the sides I placed the boards side by side, ran the router from a finished part to the second, and removed extra material to make the boards even. To give it a more rounded look at the edges, I used the fillet bit and removed 1/4″ of material. (The bit for this step came with the Ryobi corded fixed router so it was cost neutral, the 1/2″ dado bit though cost me extra.) To stabilize and hang the end product to the wall we bought an extra cedar board (1″x 4 ft) and cut it down to size. You can use the left over plywood too but I had to scrap my extras because I used them to calibrate the router bit depths.
After everything was cut to size and fitted, we painted it with a polyurethane and stain in one product from Behr. (The color pictured below is called Kona.) While it dried, I Kreg jigged the stabilizers so they would grip the wood better saving me the headache of designing cleats. Screwing the assembly together was easy, and 5 mins later we transported it to the master closet for installation. It took 2 screws on each stud, 3″ long, to feel comfortable with the hanged unit. The width of the shelves are 21″ so it wasn’t dead center in the room but we didn’t care about the asymmetry.

Fit check and Kreg jig steps. Copyright MrsEnginerd.

Once it was up on the wall I added the shelves and put together the rods. Closet reach experts insisted that the optimal installation heights for a dual rod configuration are 80″ and 40″ from the floor so we followed the recommendation. They also insisted that the rods needed to be 12 inches off the wall so that the clothes didn’t touch it. This directive put the rods off the studs at the walls requiring 100 lbs drywall anchors. (So far it is holding up nicely and the extra safety factor gives us peace of mind.)
The fit for the rods was tight and snug into the wall and unit after cutting about 1/8″ to a 1/4″ on each side.

We missed getting the correct length of pupe because of a miscalculation. 😦 Because we had to cut the thread off the pipe isn’t all the way in, but it was enough for our purpose. To avoid this inconvenience Measure the pipe length from thread to thread to be the space length – the supports dimension +/- 1/8″ or it won’t fit. (We were short 3/4″ on one of the pipes and had to use some plywood to compensate.) Even if you cut it like we did and take it back to Home Depot to get it fixed, the thread is longer than the depth of fitting so part of it will be exposed. (That’s what gives the coveted industrial look more street cred.) Be advised that the black coating on the pipes will ruin your clothes if you don’t remove it. The one on my pipes came off with water+soap+brush, revealing the darker but shinny metal underneath. If you want the black effect you must paint the rods.
Note: If you have a bigger space, you can go for 22″+ units and doors to cover up the clothes and place them out of view.
The right side of the closet has longer rods and a need to have a dress/long garment space so the bottom rod bends into the wall and connects to the stud. The top rod attaches to the drywall with the same anchor screws as before. I had purchased 4 extra anchors just in case I wanted the bottom rod to measure 5ft like the other one since our studs were at 48″ from the outside of the center unit and 64″ respectively but we opted to use the stud and have the pipe cut down to size. To reach the wall we used an elbow and a 10″ pipe which made the rod position less than 12″ from the wall by a small fraction. 🙂
If you want to add drawers or make the center consol wider than 21″, you can adjust the measurements accordingly. French cleats are another option to hang the center unit if you don’t want it to support itself on the floor. We’ll add a top shelf later. Need to unpack the rest of the house first. Hehe.
Voilà! Walk in closet trophy unlocked. 😀


3 replies on “DIY Master Bedroom Closet For Less than $500!”
[…] protect the frame, I decided to stain it with the leftover product I used for the Master Closet DIY. The color is called Kona and is a Varathane stain + poly mix that is very easy to use with a […]
LikeLike
[…] to our new home and the upgrades and updates are almost completed on the inside. Check out the Master Closet Under $500 DIY, the Industrial TP holders, the pantry update and the light switch replacement for more info. We are […]
LikeLike
[…] helped me install, is safely and neatly in its place. The master bedroom closet was done (check the link for that DIY), the pantry was upgraded (link here), and the toilet paper industrial pipe fixtures […]
LikeLike